The Soulful Art of Making Guitar End of Video

Editor's note: This is a guest post from Luke Brownish.
Learning a brief history of the cigar box guitar should give y'all some serious inspiration to build ane of your ain. The cigar box guitar was originally a homemade instrument for individuals who couldn't afford to buy an bodily instrument. The trend took off in small African-American communities in the late 1800s and subsequently during the Neat Depression because of widespread poverty.
If you lived in that time menstruum without money and you wanted to play an instrument, you lot needed easy-to-find tools and supplies, along with a talent for resourcefulness and ingenuity. The necks were usually fabricated from broom handles and most simply had one string. In fact, in that location was a saying that playing a cigar box guitar only hurt one time. When mom was gone, the kids would take apart her broom and stick the handle through a cigar box. They would then take the wire that held the bristles on and stretch information technology over the broom handle until they could produce a audio. When mom got home, she would give the kids a good whipping, simply had no mode of putting her broom back together…so the kids played, and it only injure once.
The starting time time I saw a cigar box guitar, I knew I had to build one. I hadn't done much woodworking yet, simply it looked like something I could tackle. I discovered that they are quite simple and can be congenital with some bones household tools. Equally a bonus, the cost is very low and the possibilities are endless; no 2 cigar box guitars are the same. When yous really get creative, your guitar tin say a lot nigh your personality. Make it yours.
Virtually of the tools to make your guitar are common in homes. If you don't take them, check with your family, friends, or neighbors. Any tools or lumber you lot need can be plant at most hardware stores. For the guitar components, the best place I've found to get them is online at C.B. Gitty Crafter Supply (www.cbgitty.com). A cigar box tin exist found at most tobacco shops that sell cigars for, at most, $five.
Click hither to encounter the Parts List.
In no way are you restricted to the parts listing I've provided. In that location are many dissimilar options available for tuners, strings, etc. The measurements I've provided below are for the parts I've listed. If you do choose other parts, your measurements might exist different. Apply a ruler or caliper to measure each function and so that information technology will fit correctly.
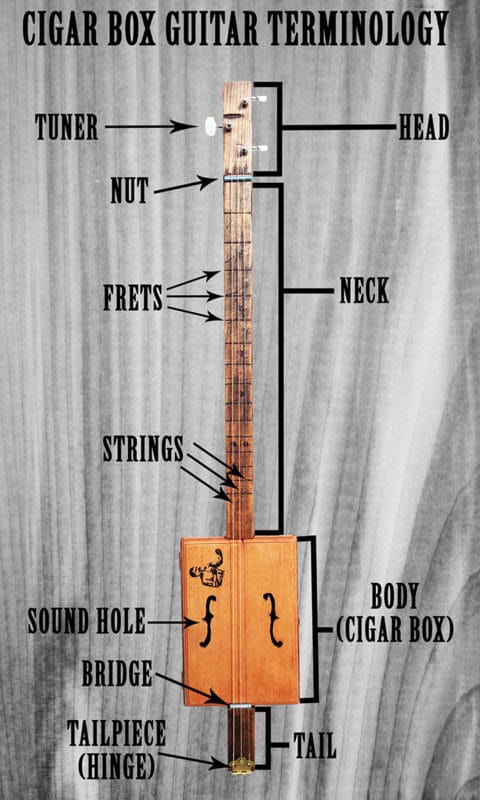
Terminology
To get familiar with cigar box guitars, the first thing to do is learn the terminology.
The Cervix
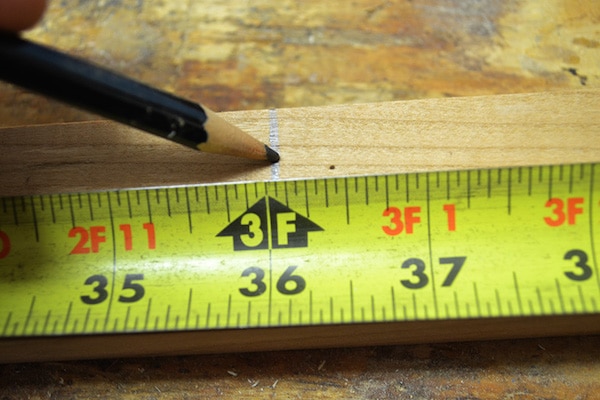
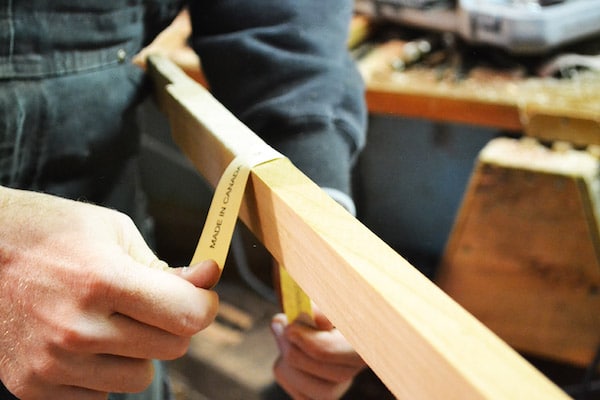
The first thing to build is the neck of the guitar. Although "neck" refers to the middle role of the guitar, our neck will extend all the style through the cigar box, and so it will be longer for now. The neck needs to be a hardwood or it will slowly curve over time with the tension of the strings. A few practiced recommendations are in the parts listing to a higher place. The board dimensions should be 1″ 10 2″ Ten 36″. After you lot buy the board, y'all'll notice that the lath's actualmeasurements are three/four″ X i 1/2″ Ten 36″. This difference volition not have an effect on the measurements below. Apply your coping saw to cut the neck to length if information technology isn't 36″ long.
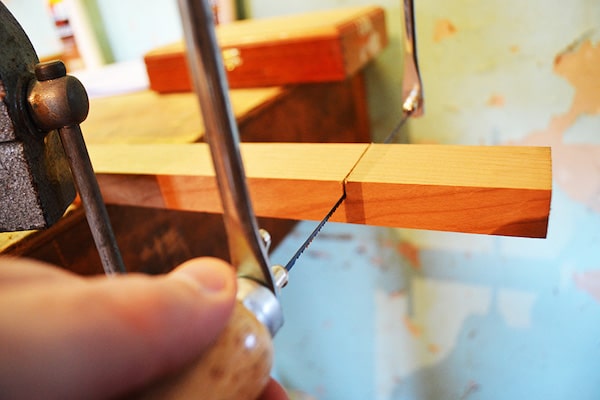
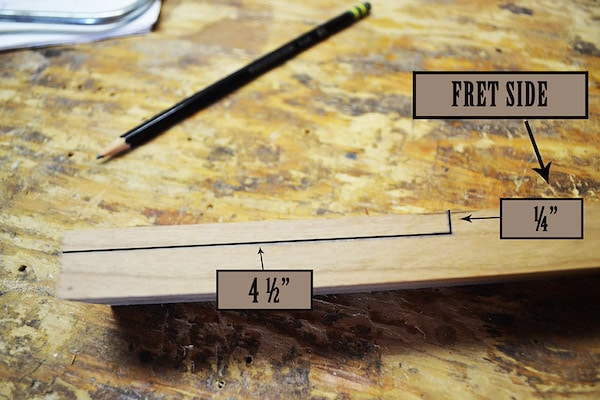
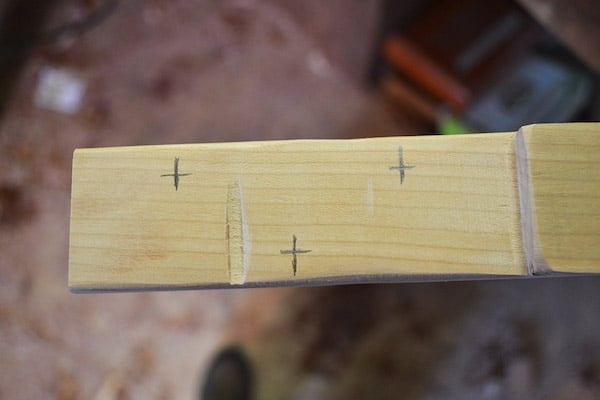
Looking at the pattern of the wood, decide which end you would like to be the head and write "head" on the end of the neck. The next matter to do is cut a notch out of the end of the head where the tuners will become. Mark 4 1/ii″ in from the terminate of the neck and 1/four″ in from the fret side (yous're marker 1/four″ on the 1″ side of the board).
Now, information technology'south time to cut out the head-piece. Use your coping saw to cut the piece out. When yous're done, use a file and sandpaper to get information technology prissy and smooth. When I build these guitars, I like to exit them a little rough around the edges to evidence some grapheme.
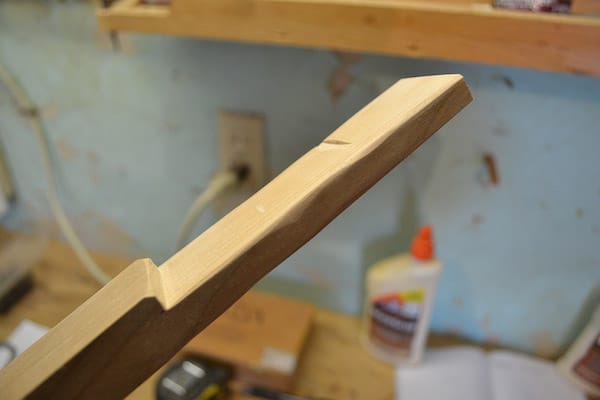
The dent is from my dog — I left it in rather than beginning over.
The Trunk (Cigar Box)
It's time to put the cervix downwardly and option up the cigar box. The way you cut the cigar box will depend on what blazon of box you have. Virtually paper-covered boxes have a lid that lays down inside the edges of the box. A lot of not-newspaper cigar boxes have a thicker hat that lays downward on meridian of the sides rather than within it. No affair the cigar box, the side by side step is to mark the place where the neck will go through. Measure out the width of the cigar box and marking the center.
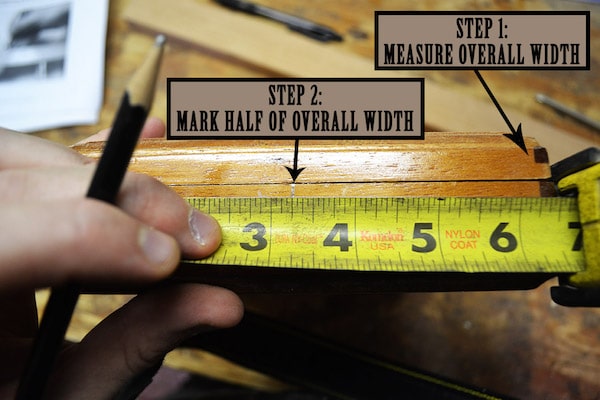
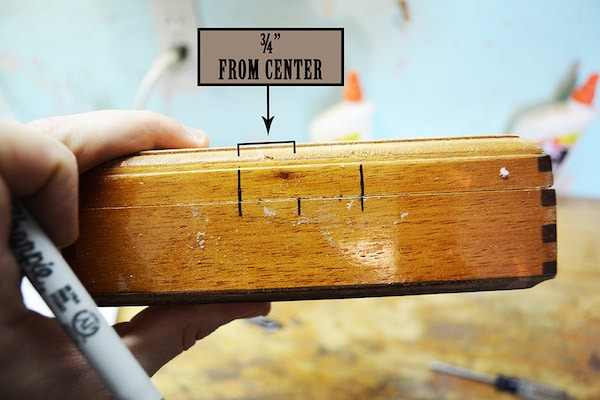
At present, measure out the width of the neck. If the neck is one ane/2″ broad, measure out 3/four″ (half) to each side of your mark and make another mark. This will keep the neck centered and tight in the cigar box.
Using a coping saw is pretty straightforward. You can straight the path of the saw by rotating the handle and the direction of the blade. You tin besides arrange the blade within the coping saw itself by holding onto the c-shape and turning the handle counterclockwise. This will loosen the tension and permit you to plough the wing on each end of the blade.
If you have a woods box: Use your coping saw to cut the hat through the lines you've made until you hit the point where the confront of the box meets the sides of the lid. (You lot will encounter a line where the face of the box is glued to the sides.) When you lot're done, in that location should be a shine flat surface from end to cease where the cervix volition lay. Do NOT cutting into the bottom department even so.
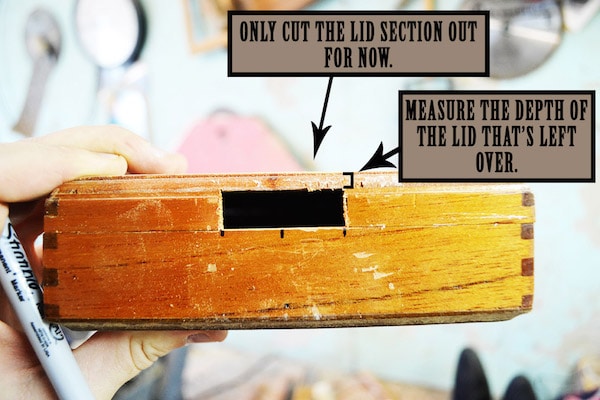
If you have a paper box: If your cervix is 3/4″ deep, mensurate three/four″ from the top of the box and depict a line between the two lines yous marked previously. Use your coping saw to cut the section out. Leave the chapeau lonely for now.
Note: It is meliorate to cut the pigsty as well minor rather than likewise big. You tin always utilise your flat file to enlarge the hole later. If the pigsty is cut too big, the neck will rattle and milk shake inside the box. Also, cigar boxes are fragile — piece of work slowly and advisedly.
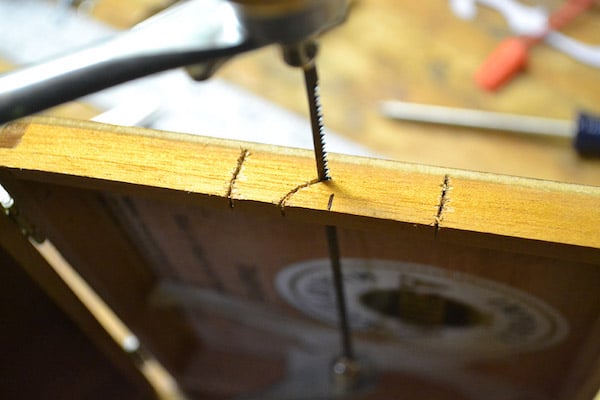
Brand this cut on both ends of the box.
Fitting the Neck to the Body
When you're done, make sure the neck fits tightly in the notches you cut out. At present, measure out the depth of the lid that's left over and the length of the cigar box. (Note: if you lot're using a paper box, simply measure the depth of the lid). Accept your neck and mensurate iv″ from the tail end. Make a mark on the fret side of your neck. Starting at the four-inch mark, measure upwardly the neck the length of the measurement of the cigar box that you lot simply took and make another marker. Turn the neck on its side and measure downwardly from the marks you lot just made. This measurement volition be the depth of the hat. Make these marks on both sides of the neck and connect them with a ruler.
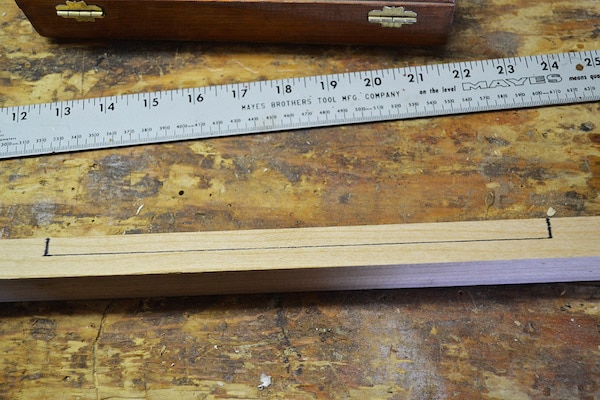
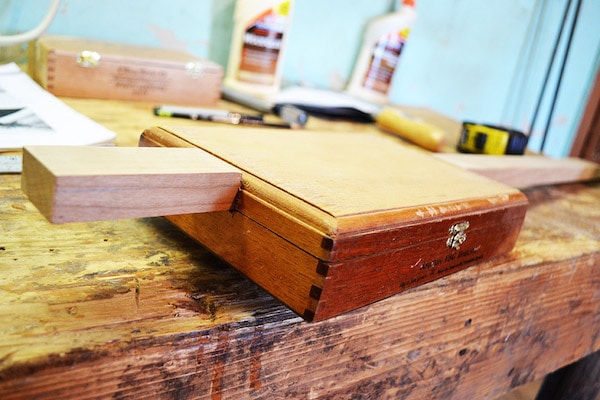
The next thing to do is utilise the coping saw to cut out the department y'all just marked. Utilise the flat file and sandpaper to get things as smooth and flat as you tin. When this is done, fit the neck into the cigar box and brand sure that the neck and cigar box are flat beyond the top. If you lot're using a forest box, y'all have one more step: measure how much of the cervix is nonetheless keeping the box from closing. Using the marks you lot fabricated earlier, utilize the coping saw or file to cut out more of the box so that yous can shut the lid snugly.
Making It a Guitar
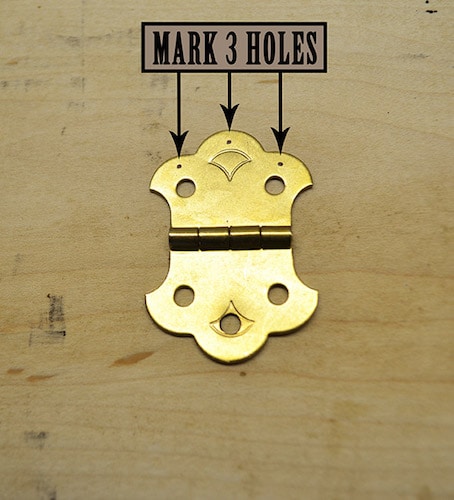
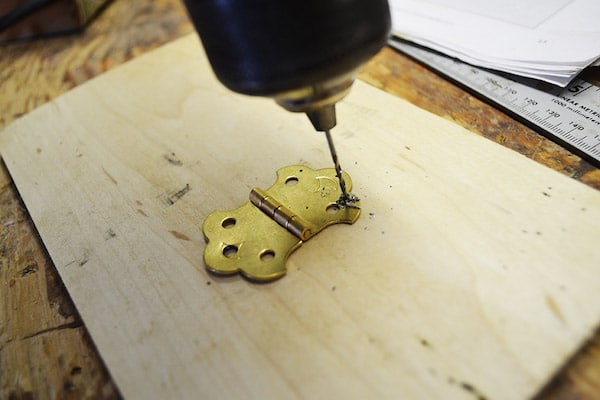
Go out your door swivel. This is going to be the tailpiece of the guitar that holds the strings in place. Marking three spots and drill them with a 1/xvi″ bit. Do this on top of an old junk board then that the drill flake tin can become through without pain annihilation.
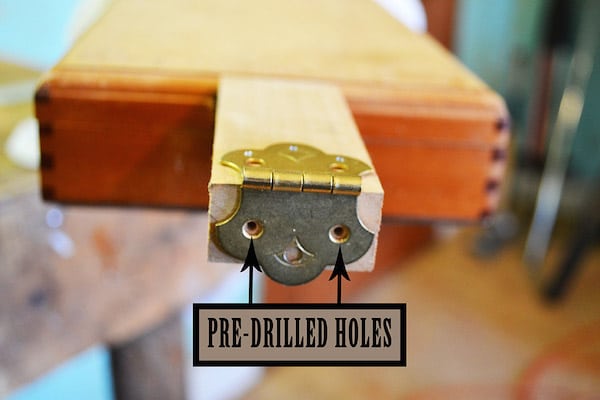
Once you accept the holes drilled, lay the hinge on the tail of the guitar. The end you lot drilled the holes in volition be pointing towards the head of the guitar. With the end that you lot didn't drill the holes in, lay it apartment on the finish of the neck and make sure information technology is centered. Marker two holes and pre-drill holes for the screws that will hold it in place. (Don't actually attach it yet, just practice the drilling.)
Pre-drilling ensures that the screws are accurate and easier to put in. All the holes in this project must exist pre-drilled. Some of the screws are very small and the heads of the screws might intermission off if you don't pre-drill. When doing this, information technology helps to determine how deep you want the hole to go. If you lot want to drill down 1/4″, measure one/4″ up from the point of the drill flake and wrap some masking tape around it. That way, you tin can drill down until you lot striking the tape and and so quit. Remember to always use a drill bit that is slightly smaller than the screw.
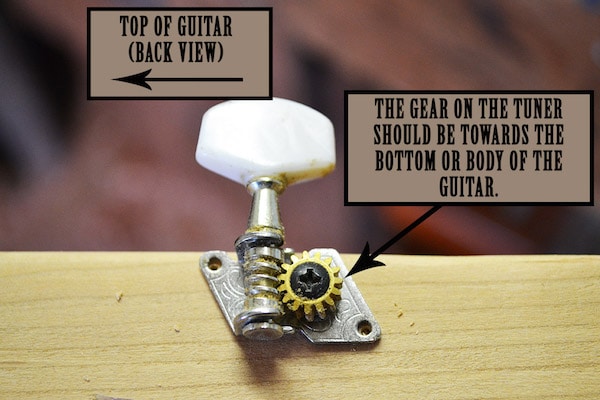
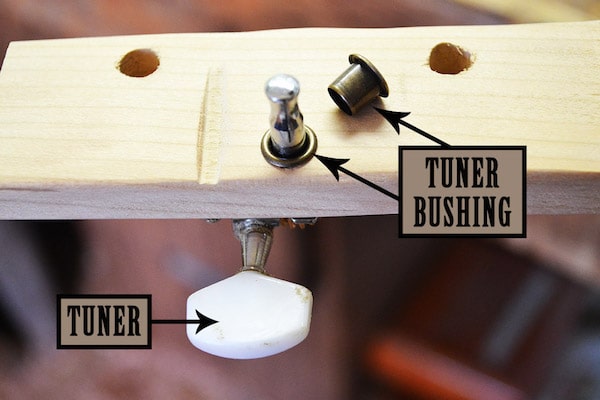
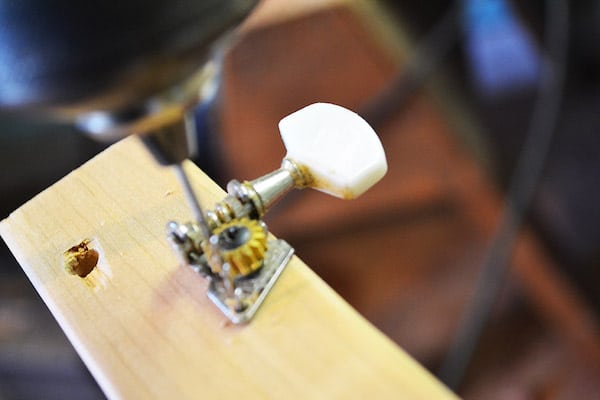
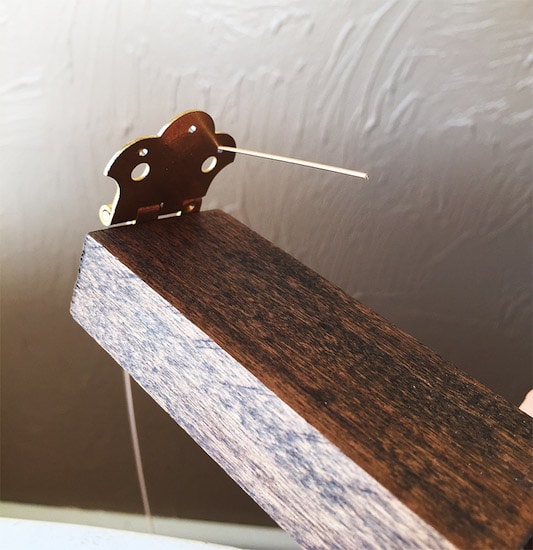
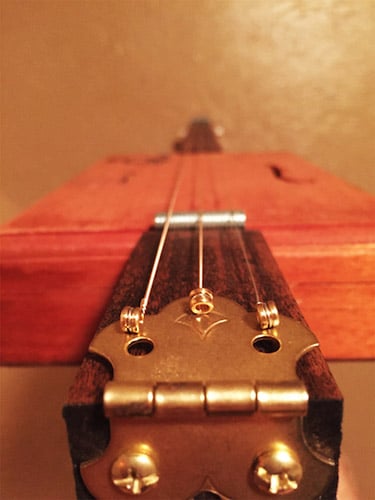
With that done, it's time to drill holes for the tuners in the head of the guitar. Whenever you are drilling, always mark the center of the pigsty. The measurements beneath give the middle of the tuner holes. Marker the holes on the fret side of the head. Important:if you lot have a pack of iii tuners, you'll need to determine if yous have two correct-handed tuners or ii left-handed tuners. Left-handed tuners are those on the left side of the head equally yous await at the upright guitar from the front and vice versa for the correct-handed. The photo below is of the back of the head, but the tuner is left-handed. The diagram below is for two correct-handed tuners and one left-handed tuner.
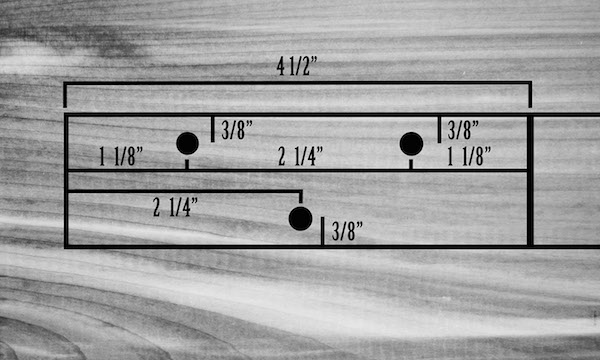
This side by side office is a little tricky. You'll need two drill $.25: 1/four″ and 5/16″. On the side facing you (movie to a higher place) you'll need to drill downwards the depth of the tuner bushings (diagram below). Mine are 3/8″, so I marked the drill fleck with masking tape at 3/8″ and drilled until I hit the tape with the five/16″ bit. When you lot have those drilled, take your 1/4″ drill bit and drill the residual of the manner through the head. When yous hold the tuner in from the lesser and put the tuner bushing in the top, it should look something similar this:
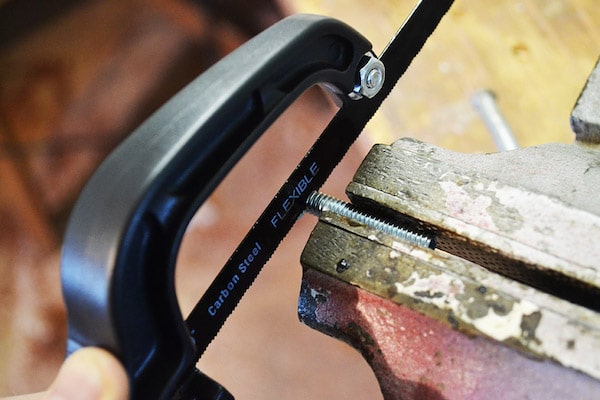
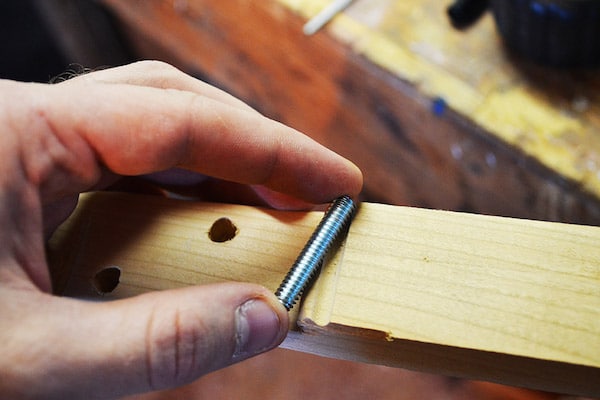
Time for the nut and bridge. If you didn't go them on the website provided, you lot tin buy a 1/4″ or 5/16″ bolt from whatever hardware store and cut the head off with a hacksaw.
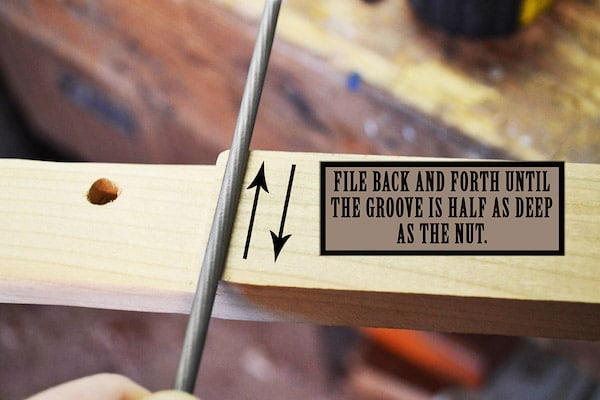
On the edge of your cervix board where the neck meets the head, make a mark 1/4″ away from the head. Utilize your round file to compose a groove where the nut volition sit. Information technology works well to make the groove half the diameter of the nut.
The span will simply sit in the small groove where the tail of the guitar meets the cigar box. Depending on how the neck fits into the box, you can detect a bigger bolt/bridge to get the strings at the superlative y'all want. The purpose of the nut and bridge is to give the strings altitude from the neck and to give you a "calibration length." Scale length is the distance from the center of the span to the center of the nut. In one case you have institute the calibration length, yous'll need to use a fret estimator to determine the distance between the frets. I utilise this website to find the fret distances. In the beginning slot, you can put every bit many frets in as you want. I just enter 24 and so make up one's mind how many I want every bit I go up the neck. It depends on how loftier you might want to play. I never play above 15, so that'due south unremarkably every bit far as I go. On the scale length, enter the measurement you took from the bridge to the nut. Attempt to exist as accurate as possible. Cull your unit of measurement and "acoustic guitar." It should give yous something like this:
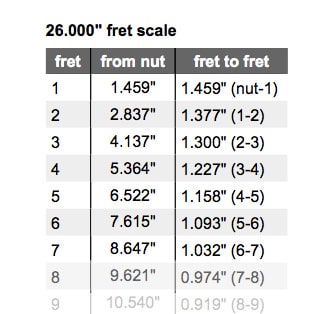
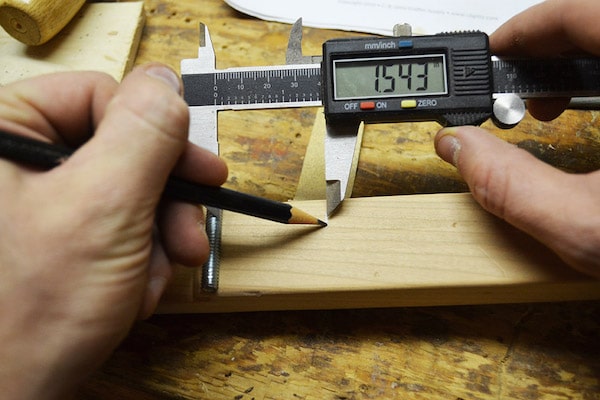
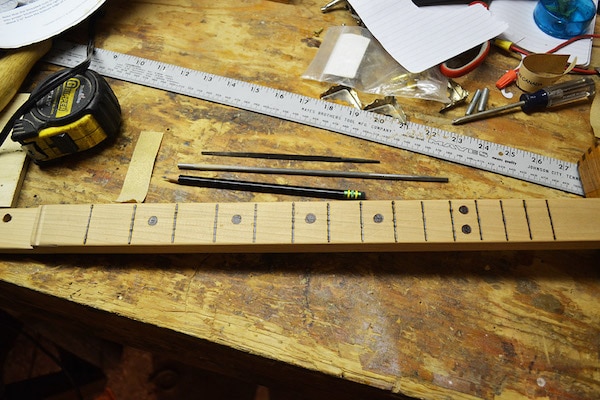
Once you have your fret calibration, utilize your caliper to mark fret to fret (starting from the nut). You'll need to be very accurate here. If you measure the commencement fret wrong, all of the frets will exist incorrect. If y'all want to marking the common blues calibration frets, mark a circle between frets two-3, 4-five, 6-vii, 8-9, and xi-12 (double circumvolve). (Notation: in the flick beneath, my starting time fret was 1.543″. The fret scale higher up is just an case.)
Once you accept all of the frets marked, you'll demand to mark them permanently. The easiest way is to purchase a wood-burner and burn down them in that way. When I didn't have a wood burner, I used a gas stove and a smash held past pliers to fire them in. Advisedly hold the nail over the flame with the pliers until it'due south hot and then burn down the woods along the line you made.
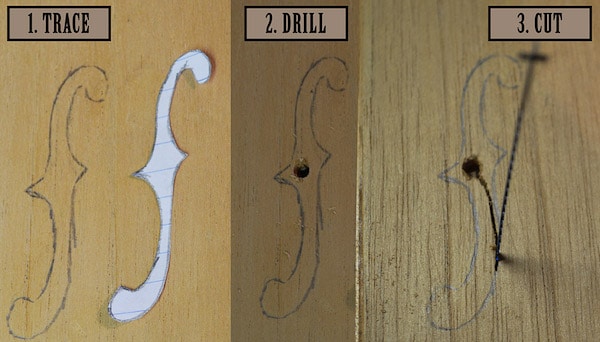
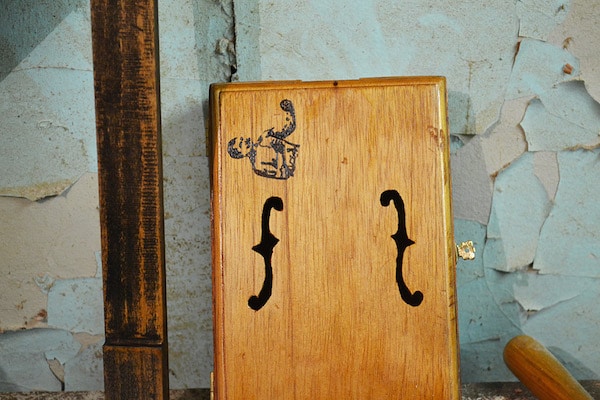
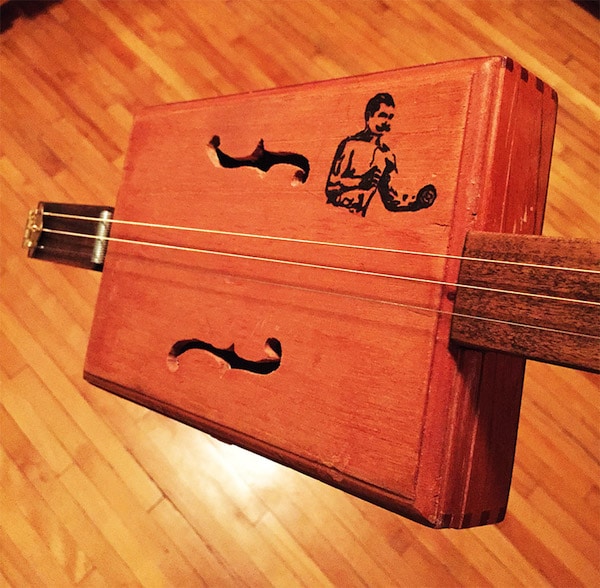
Information technology'southward time to cut sound holes in the cigar box. This is a identify where you tin can exist actually artistic. You can make a hole in any shape or form that you want. For mine, I decided to employ f-holes. Yous tin can either sketch your audio pigsty on the box free paw or you tin can sketch it on a piece of newspaper and cut it out. Since I was making 2 holes, I traced information technology so that they would be identical. Once you have the marks on the box, drill a pigsty in the box where the pigsty is going to be. Now, unscrew the handle of your coping saw and remove the blade. Y'all can now pull the saw back and along through the chapeau to cut out your blueprint. If you accept gloves, wear them…this can be hard on your fingers.
In one case you have them cut, utilise your flat and circular files to get them looking sharp.
Personalizing Your Cigar Box Guitar
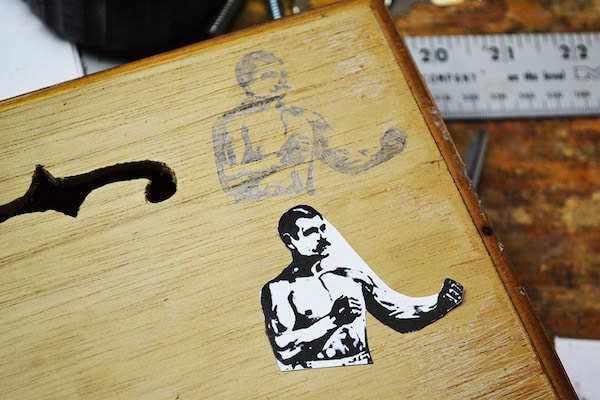
Here is where you actually make this guitar yours. Yous can sketch something you similar on the guitar or observe an image that you like and use a photograph editing program to make information technology black and white. Impress out a few different sizes of the image. Cut them out and try them in different places on your guitar. The back of the guitar provides a large canvass or y'all can use any open space on the front. For mine, I decided to use the Art of Manliness logo and put information technology in the top right corner of the forepart side. Wherever you lot determine to put it, yous'll accept to sand the finish off of the forest. Trace the epitome onto the wood and exercise your best to make full in the shaded areas.
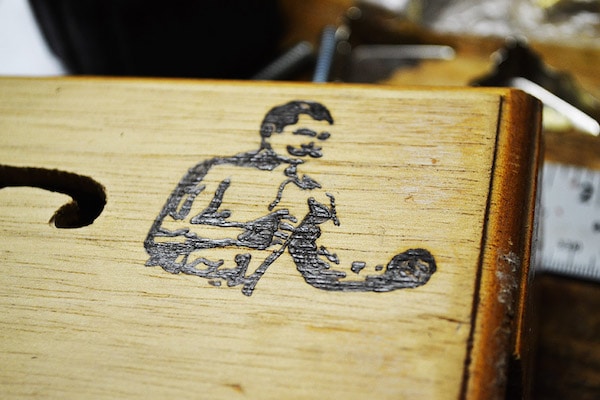
Employ your forest burner or heated nail technique to burn down the dark parts of the image. If you mess up, you can always sand information technology off for touch-ups.
If you want to leave the wood raw and unfinished, you can kickoff assembling the guitar right now (skip alee to the adjacent section). However, if you want to stain or varnish the guitar, now's the time to do it. If y'all want to stain it, y'all tin can do that now or sand off some rough edges. To go it shine, commencement with a lower dust (rougher) sandpaper, like 100-grit, and move upwards through 320-grit. Call up to sand with the grain of the wood and not against it ("with the grit" means to sand with the lines in the wood rather than confronting). I like to get the neck edges rounded so that I can play information technology smoothly and not have to worry virtually getting cut. The easiest way to exercise this is past cut a strip of sandpaper almost an inch wide and pulling it dorsum and forth over the sharp edges.
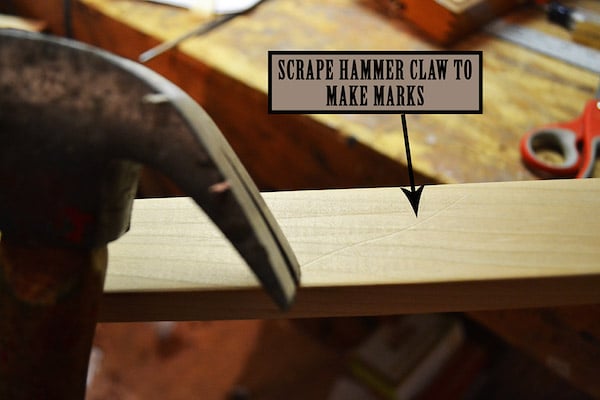
Keeping with the rustic experience of the cigar box guitar, I sometimes brand marks in the woods that make information technology look a fiddling beat up. This can be done with a knife, screwdriver, or hammer. If y'all stain it, the stain will be darker in any marks that yous make.
The stain that I've establish to work best is oil-based. Find a stain color that you like and an former rag. You tin can stain the parts dissimilar colors too; I stained the box ane color and the cervix another. Y'all'll have to take out the tuners, screws, and tailpiece. Shake up the stain tin can for about a minute and remove the lid. Wearable latex gloves to protect your easily from the stain and harmful chemicals. Dip your erstwhile rag into the stain and rub the stain into the wood. If you want information technology darker, y'all tin reapply the stain after 30 minutes. When you're happy with the color, set the neck and box out to dry out overnight.

The easiest way to finish the cigar box guitar is to use a can of aerosol lacquer. You can use either glossy or satin. Glossy will appear shiny and thick while satin will exist more subtle. Shake the can for a full infinitesimal and so hold the information technology 12″ abroad from the wood. Lay the wood on some plastic or newspaper and so that you don't go lacquer all over your tools and workspace. Hold the nozzle down and spray back and forth, releasing the nozzle at the end of each sweep. Don't spray too much or it volition run. It's amend to spray on too little rather than as well much, as you lot can always put on more coats afterwards. When ane side has stale, flip the project over and spray the other side. Information technology's best to do this within a garage so that bugs and dust don't get stuck in the lacquer. When the lacquer is no longer viscid, you're ready to get together your guitar.
Assembling the Guitar
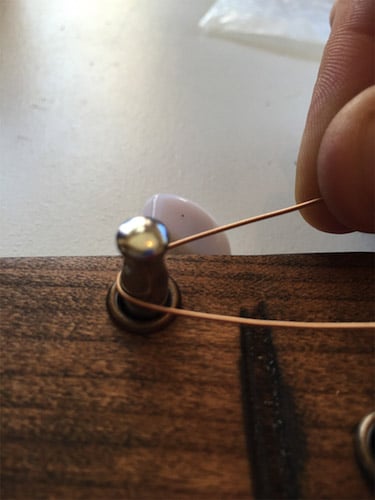
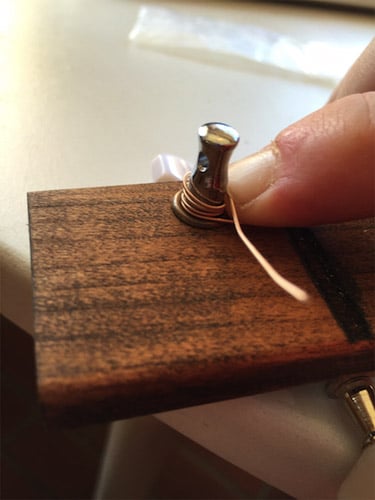
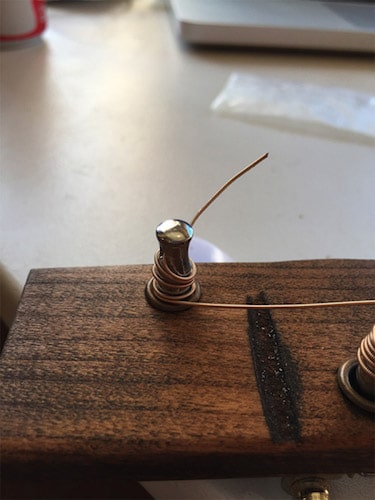
Place the neck back into the cigar box and install the tuners, tailpiece, nut, and bridge. Take out your set of strings and run them through the holes of the tailpiece. The largest cord goes on top and the smallest on the bottom. Run the strings over the span and nut. When yous get the string to the tuner, make equally many wraps equally you can starting from the bottom. When there's an inch or two left, run the remaining cord through the hole in the tuner and pull it tight. Turn the tuner until at that place'due south some tension on the string. You can then move it around on the ridges of the bridge and nut so that they are evenly spaced.
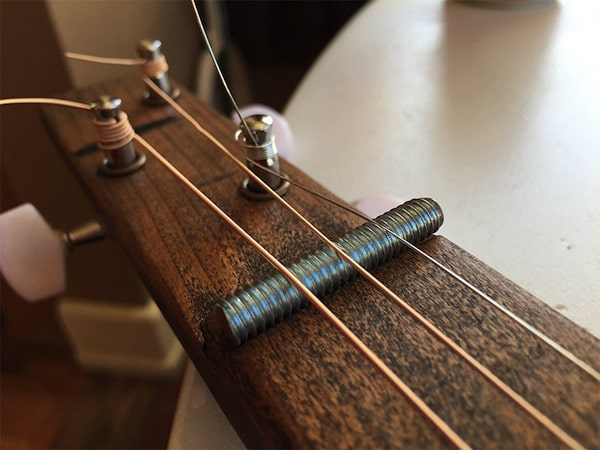
You can tune the strings by searching for an online tuner, buying a chromatic tuner, or installing a tuning app on your telephone. The manner you tune your guitar depends on what strings you lot bought. I bought low open Yard strings, so mine are tuned to G-D-G. As the strings pull everything together, they will get out of melody very easily. The first fourth dimension you tune a guitar, it usually takes 4 or 5 tries to go it to stay.
One last step: get yourself a guitar selection and a slide. You tin can buy a slide or you tin make 1 past breaking off the peak of a glass bottle or cut off a piece of copper pipe that fits your finger. About slides are iii or four inches long.
Learning how to play can be discouraging at starting time only, with practice, you'll get good at it. In that location are plenty of how-to videos on YouTube that you can learn from. They will teach you songs, theory, and mode. One who provides swell lessons and tutorials is a homo named Mike Snowden. His YouTube aqueduct can exist institute here.
In the short tutorial I've provided, in that location are 4 important frets. They are the 3rd, 5th, 7th, and 12th. These are the main frets of the dejection scale and experimenting with them will teach you many songs. A free metronome on a website or app on your smartphone volition help y'all go on rhythm. It might sound strong at commencement (like in the video below), but once you go it down, it will sound much more natural. When you've gotten skillful enough, yous can stomp your foot or improvise in the songs to make them your own.
Now that you lot've got the hang of edifice a guitar, your adjacent one will be even amend. Look at dissimilar guitars on the net, option out things yous like, and put them on your side by side one. If you look hard enough, y'all'll find cigar box ukuleles, banjos, and even violins. You tin can make your guitar electric, make different head designs, add together steel frets, and fifty-fifty put more strings on it.
Go to it, and if you brand one, come up back here and leave a comment with a motion-picture show of it.
__________________________
Luke Dark-brown is a rancher & self-taught carpenter in Western Due south Dakota. Using his feel as a carpenter, Luke founded the Cedar Horse Workshop with his passion to spread and teach the skills of craftsmanship.
Previous Next
Source: https://www.artofmanliness.com/living/leisure/how-to-make-a-cigar-box-guitar/
0 Response to "The Soulful Art of Making Guitar End of Video"
Postar um comentário